Posts written by angelofarina

view post Posted: 30/1/2020, 10:52 Aurora for Audacity Beta - General
In your case, as you record a synchronous recording of 4 channels, better to switch back to version 2.0.0, for which we made available the ASIO-enabled version. It is here:
http://www.angelofarina.it/Public/Aurora-f.../2.0.0/Windows/
The password for unzipping the ASIO-enabled executable (which you should copy over the standard version executable) is just my name.
Of course you need to use the Aurora modules fopr version 2.0.0.
Regrading convolution, after recording your 4-channels sweep from the microphones, and imported also the invsweep, your situation will be something like this:

A-format

Now you invoke the Aurora Convolver, drag the A-format channels to Data and the invesweep to Filters, and select the "one for All", forcing this single inverse filter to be applied to all 4 input channels:

Convolver

Press Continue:

Convolver2

Select "full Autorange and presse Calculate! The result will be 4 new mono tracks, containing the deconvolved impulse responses...

Deconvolved-IRs

Now you can cut short just the portion of the linear IR you need, and export it to a single 4-channels WAV file (of course this 4-channels export is possible only after having disabled the stupid option to downmix to stereo which Audition sets by default).
view post Posted: 25/1/2020, 18:26 STI measurements - Usage
Probably there is some misunderstanding of the procedure...
At 1m from a powerful line array, the equalized pink noise will probably be well above 100 dB(A)!
The calibration at 60 dB(A) at 1m is for the artificial mouth. When there is a PA system the artificial mouth should be placed at a few cm from the microphone employed for the announcements.
Then the gain of the PA system is adjusted until the system delivers the contractual SPL at the reference listening position. A typical value can be something as 80 dB(A) in a listening position very far from the loudspeaker.
In venues where the microphone is inside tha same room as the loudspeakers, usually the gain is limited by the feedback.
This is not an issue when the microphone is in a separate room, so there is no feedback.
In this case, it is also possible to inject directly a dummy microphone signal in the PA system, obtained recording the signal from a typical PA microphone placed in front of the calibrated artificial mouth.
When instead the microphone is inside the venue, the use of the artificial mouth in front of the microphone is mandatory, you cannot measure STI injecting an electrical signal into the system.
view post Posted: 23/1/2020, 11:17 STI measurements - Usage
Some part of the new standard rely on absolute SPL correction factors, hence the answer is NO. You cannot make a calibration "realtive" to full scale, you need to calibrate your source in "absolute" dB-SPL.
However, I do not see the problem.
I usually calibrate the source at the beginning of the measurement session. I just place the SLM at 1m from the source, on axis, and I adjust the knob until I read 60 dB(A). It takes perhaps 1 minute, so what's the problem doing this?
What can be done in advance is to create the pre-equalized pink noise WAV file to be played on your specific source.
While the loudpeaker is behaving linearly, the equalization is independent on the the gain (and of consequence on the absolute SPL value).
For creating the pre-equalized pink noise WAV file you start with a flat pink noise, generate with Adobe Audition, long, say, 1 minute.
You play it and record with a microphone in front of the source, at 1m.
Make an octave-band analysis using the Aurora STI module, and copy and past the spectrum to an Excel spreadsheet.
Evaluate at each ovtave band the difference between the octave-band level and the total A-weighted level, and write these number below those mandate by the standard, and shown in the table above (for male speaker).
Of course there will be discrepancies, at some frequencies the measured value will be larger and at other frequencies the measured value will be smaller than the value in the IEC table.
At each frequency, you calculate the correction (value in the table - measured value).
These are the offsets to be applied to the pink noise wav file, using the Audition's graphical equalizer effect, set in octave-band mode.
At each frequency, move the slider (or key-in the value) of the offset computed in Excel, then hit apply.
The result will be a new WAV file containing equalized pink noise.
You can repeat the playback & recording again, for checking that now the resulting octave band spectrum is compliant with the table in the standard. If it is not, compute again the residual correction to be applied, and perform again the graphical equalization in audition.
repeat until the measurement shows a spectrum which is perfectly compliant with the IEC standard.
this WAV file will be used for feeding your loudspeaker when doing measurements. after adjusting the total A-weighted level to 60 dB(A) at the beginning of each measurement session, as explained.
view post Posted: 20/1/2020, 09:51 Setup instructions - Installation & Setup
CITAZIONE (kosbax @ 17/1/2020, 15:02) 
thanks a lot

I made a couple of tests on Catalina. Unfortunately, PlayOnMac does not work yet.
Audacity, instead, was released at 64 bits, but for using it under Catalina a "trick" is required, launching it form the terminal.
It is explained here:
https://forum.audacityteam.org/viewtopic.php?f=47&t=107162
So the problem now is to recompile at 64-bits also the Aurora modules. I am sad to admit that this will take several months...
In the meanwhile, I strongly suggest that you use Bootcamp for running Windows 10 on your mac.
Due to the bad development Apple did on Mac OS, and the good improvement provided by the last upgrade of Windows 10, the same Apple machine is currently 50% faster when running Windows 10 under Bootcamp than when running Catalina.
All our Macs are now running Windows 10 under Bootcamp, and we do not see any reason to switch back to Mac OS in the next future...
view post Posted: 17/1/2020, 14:31 Setup instructions - Installation & Setup
Audacity does not work under Catalina, as Audacity is 32-bits only !!!
What I suggest is that you install Playonmac, and then install Adobe Audition 1.5 (for Windows) under Playonmac.
Not tested yet under Catalina, but this is my preferred solution for running Aurora on Mac computers, up to Mojave.
view post Posted: 31/10/2019, 09:59 Kirkeby Inverse FIlter - Request for Help
how did yoy perform the convolution?
It look as if a circular convolution was performed, instead of a linear one.
Please use the Aurora Convolver...
view post Posted: 24/10/2019, 21:40 Kirkeby Inverse FIlter - Request for Help
The IR should be cut as short as possible.
Before the linear IR there is only noise and distortion products. It is not a good idea to insert these in the calculation of the inverse filter.
Better to keep just the useful information and discard noise and distortion artifacts...
view post Posted: 10/10/2019, 09:06 Aurora for Audacity - Exporting from Time History Analyzer - Request for Help
I am still using Audacity 2.0.0. Asio version, you find it on my web site...
Try with this older version...

Well I just tested. It seems that the export function was not implemented yet...
You should use the Aurora for Audition plugins, they have proper file export in Time History analyzer.
view post Posted: 7/10/2019, 08:19 Kirkeby correct BRIRs without efecting the reverb? - Request for Help
Also a ray tracing - beam tracing program can create low frequency resonance - antiresonance effects, if the calculation of the impulse response is done correctly.
For example, my own beam tracing program, Ramsete (www.ramsete.com) works properly even at low frequency. It also creates Ambisonics impulse responses, which are then properly converted to binaural by the player or by the web portal (Youtube, Facebook, etc.).
Albeit I purchased Rayspace, I only use it as a demonstrative tool for my students. For serious work I prefer, of course, to use Ramsete.
For example, using Ramsete I recently created a filter matrix emulating a 12-channels surround system inside a car cockpit, with Ambix 3rd order (hence a matrix of 12x16 impulse responses.
Sounds almost not distinguishable form measurements in the same car...
Cannot release the filter matrix, as the project is ongoing, but I will publish it at the ISNVH 2020 Conference in Graz, the next year...
view post Posted: 3/10/2019, 11:27 Kirkeby correct BRIRs without efecting the reverb? - Request for Help
OK.
So you want the room, but you want it to sound "spectrally neutral", without colouring.
When I had the same requirement, in the past, I was happy creating a "virtual room" using software such as Voxengo Impulse Modeler:
www.voxengo.com/product/imodeler/

Or as Rayspace by Quikquak:
www.quikquak.com/prod_rayspace.html
view post Posted: 30/9/2019, 07:51 Kirkeby correct BRIRs without efecting the reverb? - Request for Help
However I really do not understand yet your goal.
If you want to remove from the BRIR the colouring and room effect, and instead you want to keep the effect given by the binaural microphone, what's the point of starting from a measured BRIR? Just employ a set of clean HRTFs, with no room.
You can create a perfectly dry virtual surround system employing a free binaural renderer, such as those provided by Sennheiser Ambeo, or included in free plugin suites such as Sparta and IEM....
view post Posted: 26/9/2019, 17:31 Kirkeby correct BRIRs without efecting the reverb? - Request for Help
Kirkeby does take quite a lot to be understood. You must read his papers on Jaes and IEEE journals..
For getting the link to downliad Audition 3, write me an Email.
view post Posted: 19/9/2019, 10:27 Kirkeby correct BRIRs without efecting the reverb? - Request for Help
For just equalizing the binaural microphone employed for the measurement you need to invert the anechoic impulse responses of that binaural microphone.
But this solves only half of the problem, as you should equalize also for the frequency response of the headphones employed during sound playback.
Hence the best thing to do is to invert the complete "headphones+binaural microphones" transfer function, in a single step.
this is easy if you have by hand both the headphones AND the binaural microphone.
Place your headphones over the dummy head, and measure then transfer function from each loudspeaker to each ear, then use Invert Kirkeby for creating the inverse filters.
They will equalize both for the microphone response AND for the headphones response.
For example, we usually employ a Neumann KU-100 binaural microphone for recording BRIRs.
And at playback we use the Sennheiser HD 4.30 headphones.
So we measured the response of these headphones placed over the Neumann dummy head, and computed the proper eq filter with Kirkeby.
Convolving the BRIRs with such eq filters, you get a BRIR which still contains the full room response, but having removed the colouring caused by headphones and by the binaural microphones...
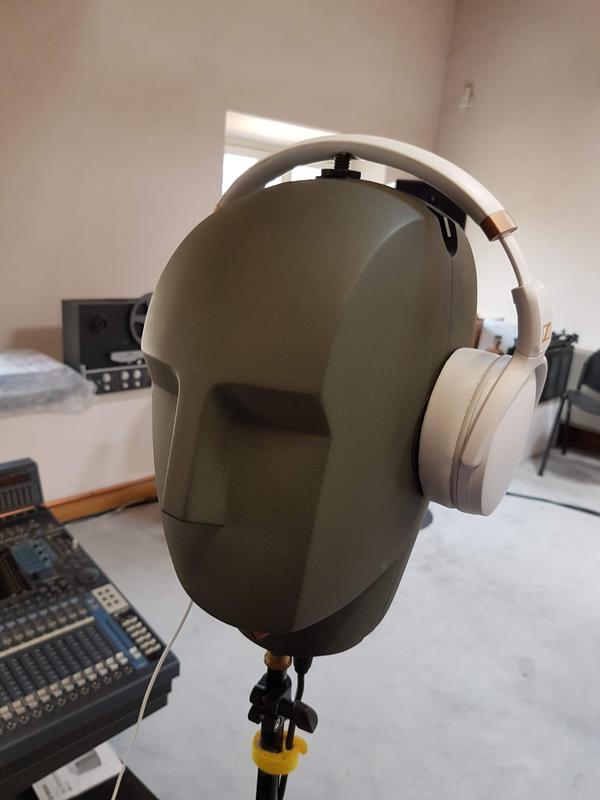
Here the headphones over the dummy head:
20180710-143350

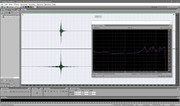
Here the measured transfer functions between the Sennheiser HD 4.30 and the Neumann KU100:

Headphones-IR

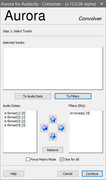
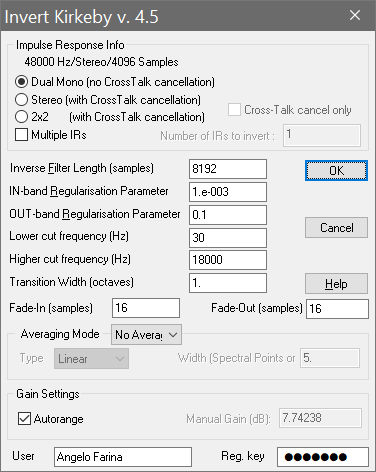
Here the settings of Kirkeby for computing the inverse filters:

Invert-Kirkeby

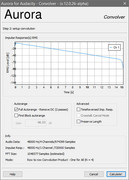
Here the resulting inverse filters:

Headphones-Inverse-IR

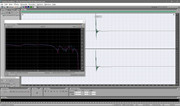
And here the verification, obtained convolving the measured transfer function with the inverse filters:

Headphones-equalized

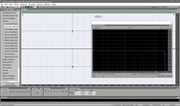
As you see, the Kirkeby inverse filters equalize almost perfectly the frequency response of both headphones and binaural microphone....
view post Posted: 18/7/2019, 06:48 Setup instructions - Installation & Setup
There is nothing to "buy", as Aurora for Audacity is free and open-source!
And yes, it works perfectly under the latest Mac OS, with the well known trick (common to any other old 32-bits program) of launching it by clicking on the executable file of Audacity, instead of simple cilicking on its container (the audacity.app).
The details are here: https://aurora-plugins.forumfree.it/?t=55110998&st=45

The problem will probably be with Mac OS 10.15 (Catalina), as Apple announced the removal of support for old 32-bits programs...
I suppose that Audacity team will take care of this, but of course it will be necessary to recompile also the Aurora modules to 64 bits, which will NOT be trivial.
For now, with 10.14, you are fine using the old Audacity 2.0.0.
view post Posted: 16/5/2019, 11:37 Aurora for Audacity inistallation - Request for Help
ASIO support does not means Aurora modules. It means that you can use a sound card with ASIO drivers...
For installing and using the Aurora modules, you need to install an older version of Audacity. I am using version 2.0.0, which is still the best, in my opinion!
You find it on the Aurora web site: www.angelofarina.it/Public/Aurora-for-Audacity/
59 replies since 23/1/2013