First of all, it is assumed that the user already knows what is a room impulse response, and how to measure it employing an impulsive source (pistol, firecracker, balloon, etc.).
The Exponential Sine Sweep method employs a loudspeaker playing a continuous sinusoidal sound instead of an impulsive source.
The sound is simultaneously played and recorded. Afterwards, the recording is processed, with a mathematical procedure called "deconvolution", which reconstructs the impulse response from the not-impulsive recorded signal.
In the past this method was employed with other types of test signals, namely MLS (Maximum Length Sequence) and TDS (Time Delay Spectrometry), also called TSP (Time Stretched Pulse), which indeed is simply a Linear Sine Sweep.
The modern Exponential Sine Sweep presents several advantages over all the previously known methods, as widely discussed in at least a dozen of scientific papers, the first was the famous AES pre-print presented by A.Farina at the 108th AES Conventon, Paris, 2000:
www.angelofarina.it/Public/Papers/134-AES00.PDFAnd here for a further article describing improvements:
www.angelofarina.it/Public/Papers/226-AES122.pdfHere we are not discussing these advantages, nor the mathematical theory which makes them possible. Here we give simply a quick guide on how to use some of the Aurora plugins for performing a correct Impulse Response measurement.
The first thing to do is to setup your audio equipment. you need to have a PC, possibly portable, a good quality external sound card (internal sound cards are too noisy for good measurements), connected with the PC through a digital connection, such as Firewire or USB.
You can either select a sound card already equipped with good-quality microphone preamplifiers, with digital stepped gain control such as some RME, Roland or MOTU models, or employ the fixed-gain line inputs of the sound card, employing an extrenal professional preamplifier, or the AC output of a sound level meter. In any case, you must be able to keep a controlled input and output gain, so that your measurement system can be calibrated.
Low-end sound cards are instead equipped with analog knobs, they cannot be calibrated, and they are strongly deprecated for professional usage together with Aurora plugins.
We recommend to perform impulse response measurements employing a sampling rate of 48 kHz minimum, and a resolution of at least 24 bits (32 bit float recommended).
In the basic arrangement, the measurement is performed synchronously, so the same PC will play the test sound and simultaneously record the signal coming from the microphone(s). This means that the system must be completely wired, with a cable connecting the output of the sound card to the loudspeaker (employing an external amplifier, if your loudspeaker is not self-powered; however, the usage of self powered loudspeakers is recommended).
Another cable will connect the microphone with the input of the sound card.
In practice, the completely wired system will be as follows:

It's time now to generate our test signal, the Sine Sweep.
We first create a new, empty file in Adobe Audition, with the command "File - New". We are asked to choose the sampling rate (48 kHz), the number of channels (mono, as we have just one loudspeaker) and the resolution (ALWAYS 32 bits - float, for better results, despite the effective resolution of our sound card).

We can now invoke the Aurora "Generate Sweep" plugin:

We leave all the parameters at their default values: the start/stop frequencies are 22 Hz and 22 kHz respectively, the sweep is long 15s, followed by a silence of 5s, and the whole sequence is repeated 3 times.
Of course, if your loudspeaker cannot manage very low frequencies, it could be advisable to start from 40 or even 80 Hz, loosing information at the first one or two octave bands (31.5 and 63 Hz).
When "OK" is pressed, a warning appears on the screen:

This warning gives you information about the fact that not only the sweep signal has been generated, but also its inverse sweep has been generated too, and the inverse sweep is saved in the Windows clipboard.
Pressing OK, your sequence of 3 sweeps appears:

It is advisable to immediately save this newly generated waveform, as SWEEP.WAV.
At this point it is also advisable to explain that Audition has several clipboards: 5 "internal" clipboards, numbered #1 to #5, and then the standard Windows Clipboard. It is the latter the one employed by Aurora plugins.
So, if we want to retrieve the Inverse Sweep laying inside the Windows Clipboard, we must first instruct Adobe Audition to employ that clipboard, instead of its internal one, which was the default. For this, we employ the command "Edit - Select Curent Clipboard", and we choose the last one, named "Windows Clipboard".
We can now retrieve the Inverse Sweep signal, employing the command Edit - Paste to New. The following signal appears on the screen:

We notice that, whilst the Sweep signal has constant amplitude, the InvSweep has decreasing amplituide. This compensates for the fact that the spectrum of the exponential sine sweep signal is not flat (white), but instead is falling by 3 dB/octave (pink). So the spectrum of the inverse sweep must be adjusted, to be increasing by 3 dB/octave, so that, when we will employ the inverse sweep as a deconvolution filter, it will restore perfect flatness of the measured impulse response.
After having saved to disk also INVSWEEP.WAV, we are ready to perform the measurement.
We switch Audition to Multitrack mode, and insert the Sweep.wav signal in track 1. This track will be used for playback.
We now press the red button marked "R" of track 2, as this will be the track being recorded, it is where the signal coming from the microphone will be captured. If the microphone is mono, we specify that this is a Mono track. If instead we are employing a stereo microphone, for example a binaural microphone, or a pressure-velocity probe, then we will specify that track 2 is armed for stereo recording.
In this example we record a stereo signal employing a pair of small microphones inserted in the ear channels.
After setting up track 1 for playback and track 2 for recording, we press the round red button which starts the recording (track 1 is automatically played, synchronously with the recording); this is what appears during the recording:

After the recording is finished, we double click on the recorded Track 2, so that we come back to Edit Mode:

It can be interesting now to observe the recorded signal in Spectral View (View - Spectral View):

We can see that there is not just ONE sweep, there are several ones, superposed. Taking an instantaneous spectrum where the cursor is placed (Window - Frequency Analysis) , we see this FFT spectrum:

We see that there is a "fundamental" frequency, corresponding to the one generated by the original Sweep signal, but there are also peaks at frequencies double, triple, quadruple, etc... These are the harmonic distortion products, caused by nonlinearities in the loudspeaker. These distortion products could affect significantly the results, and the capability of completely removing them is one of the big advantages of the Exponential Sine Sweep method.
We come back to standard Waveform View, and we can now perform convolution of the recorded signal with the Inverse Sweep, which should be in the Windows clipboard yet (if it is gone, we can easily re-copy it to the clipboard, as we did save it).
For doing that, we invoke the Aurora "Convolve with Clipboard" plugin:

We maintain the standard settings, in particular the "Full Autorange" feature enabled. We press OK, and after a couple of seconds we see the final warning window:

It is interesting to observe the value of gain applied during the autorange process: -67.35 dB. This is the reduction of background noise achieved thanks to the sine sweep method. If a good loudspeaker is employed, this value can be close to 80 dB....
When we press OK, instead of the recorded sweeps, we see a sequence of impulse responses:

We now zoom at the first group of pulses, the ones resulting form the deconvolution of the first sweep:

The rightmost impulse response is the linear one, the one which we are interested into. The preceding ones, of smaller amplitude, are the distortion products, and we want to discard them, by applying proper windowing in time domain.
This windowing can be done by hand (Audition is very good at cut-and-paste operations), but we also have a specific Aurora plugins which takes care of "slicing" the measured multiple impulse response, leaving only the portion we are interested into.
So we invoke the Aurora plugin called Impulse Response Select:
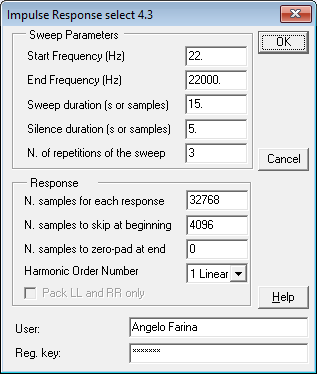
It can be seen that we are specifying exactly the same parameters employed for the generation of the sine sweep. We are also specifying to cut just 32768 samples of each linear IR, as this measurement was performed inside a small room, with short reverberation time. And we are stripping away the first 4096 samples, as the measurement was done employing a sound card which was employing I/O buffers of 2048 samples, hence a latency of 4096 samples is added to the "time of flight" and must be removed, if we want that the measured IR begins at true "zero time".
Of course, in a large room you must keep a much longer IR, 100.000 samples or more...
Pressing OK we see the sequence of our 3 "cut" linear impulse responses, one for each sweep emitted:
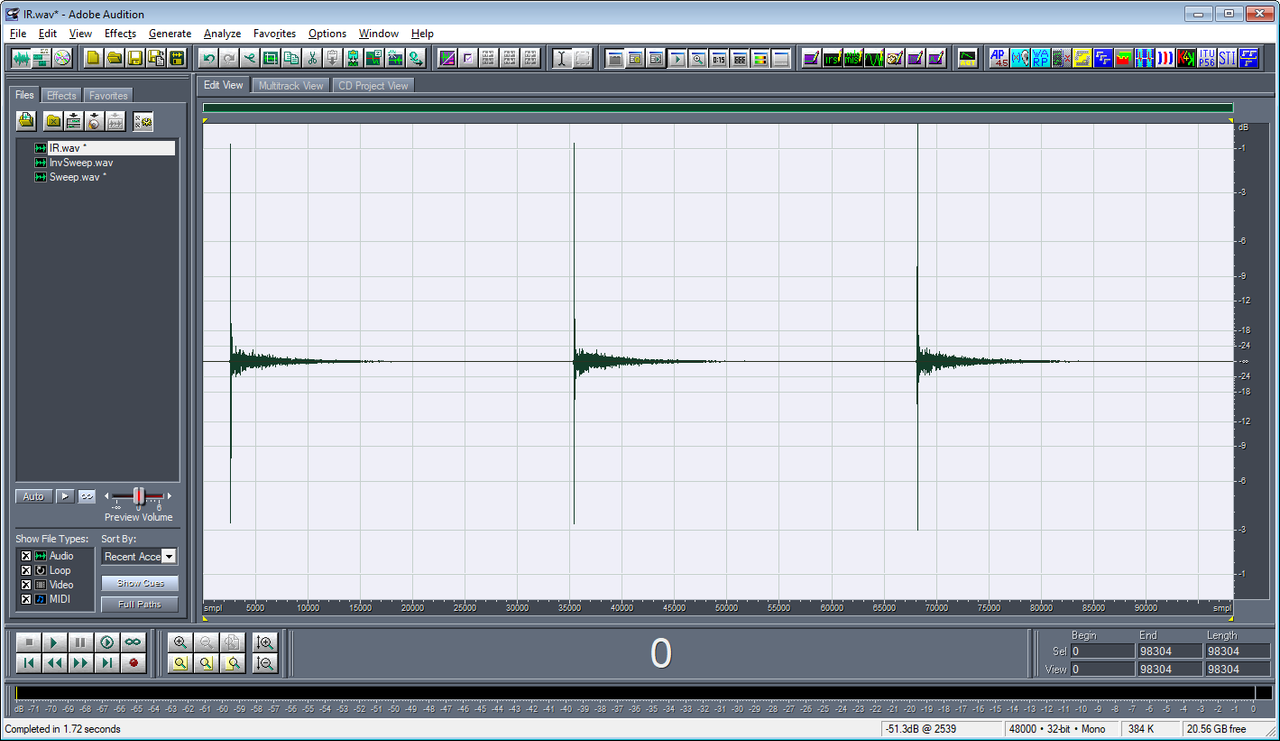
What to do with a sequence of 3 IRs? Simple... Let's just select the "best" one... For selecting, it is advisable simply to play the sound, and listen to what of the 3 is more clean... We decide that the second one is the most clean. So we now manually select it with sample accuracy, by keying-in the values of the samples at which the selection must start and its length (in the right-bottom corner of the Audition screen): 32768 as the begin sample and again 32768 as the selection length:
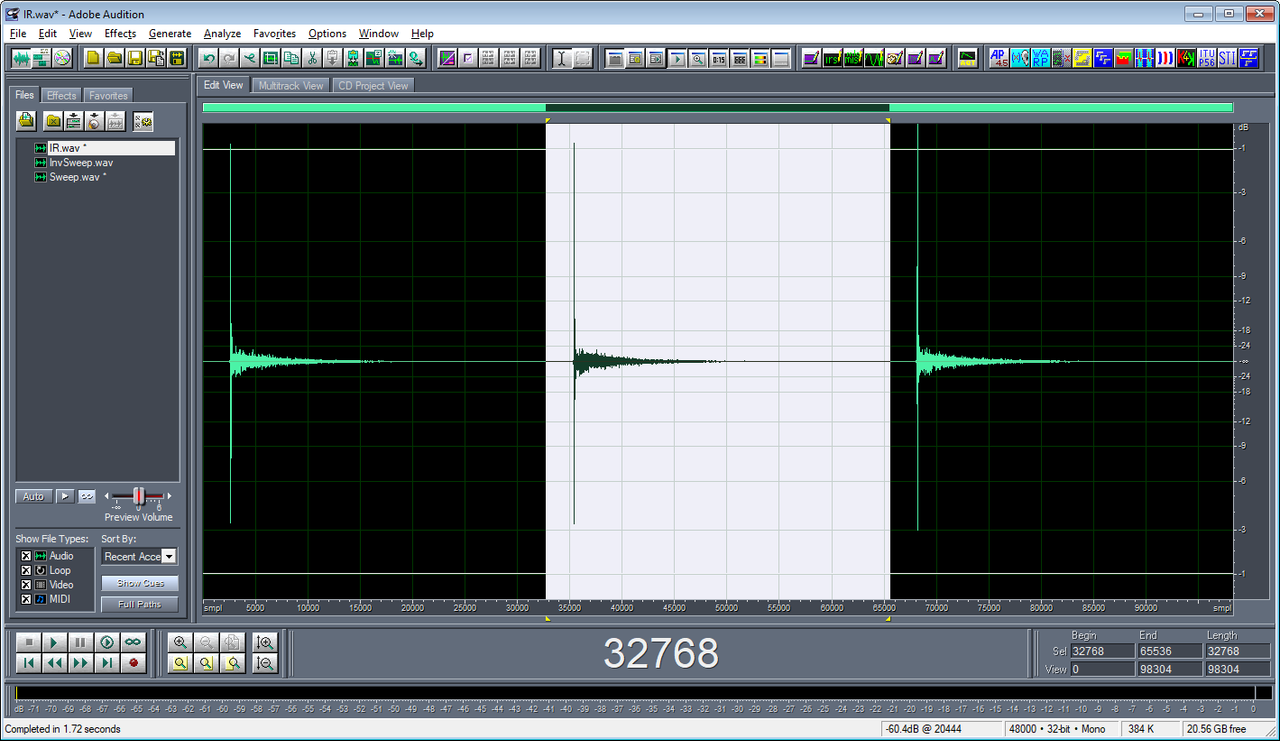
We are almost done. We now trim the selected waveform (Edit - Trim or simply CTRL-T), discarding the other two IRs, and we save the result, which is our measured IR:
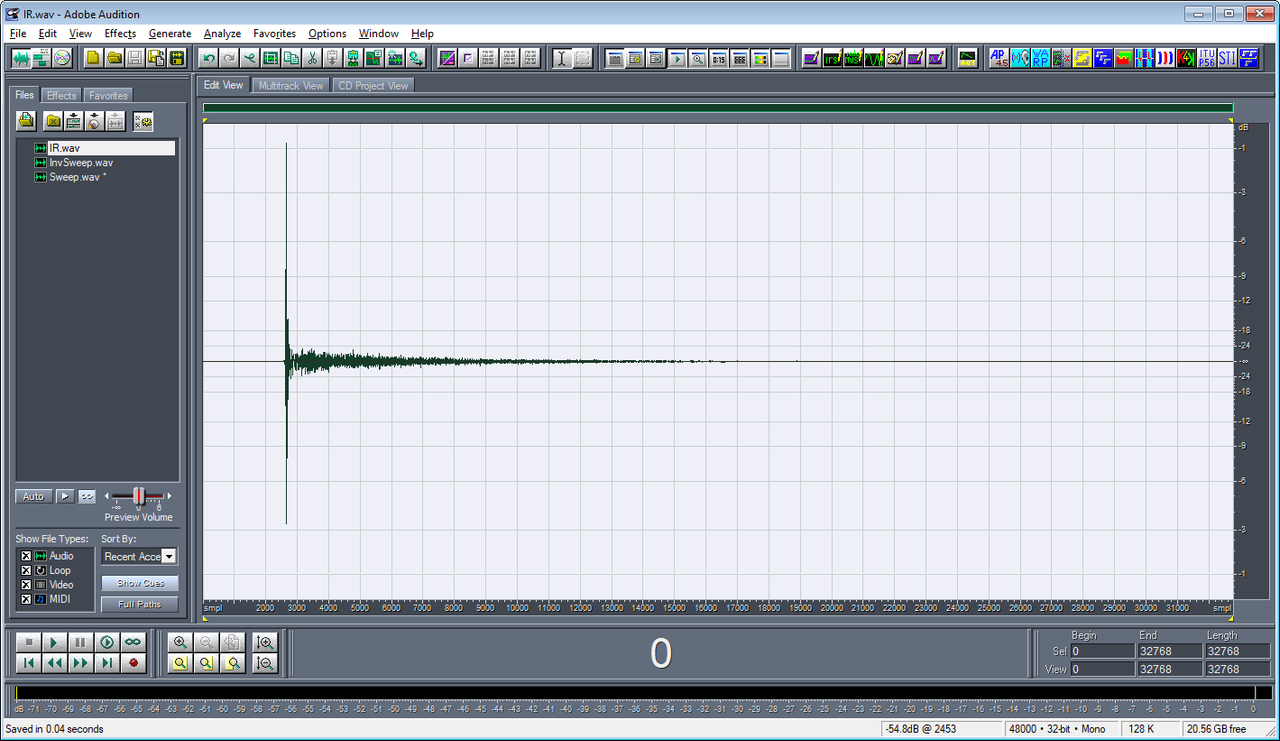
We can now employ our measured IR, for example, for computing the room acoustical parameters following the ISO 3382 standard, by invoking the Aurora "Acoustical Parameters" plugin:
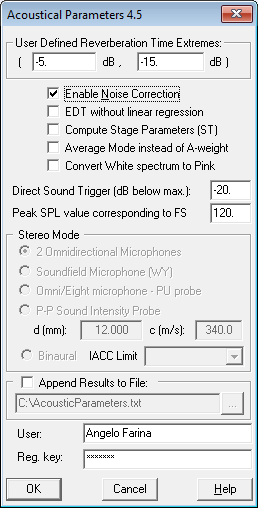
Please note that the "Stereo Mode" part is greyed out, as this recording was mono. If instead we had employed a pair of microphones, for example a dummy head, then we had selected "Binaural microphone".
The results of "spatial parameters" is accurate only if we select the correct type of stereo microphone employed.
Pressing OK, we see the results:
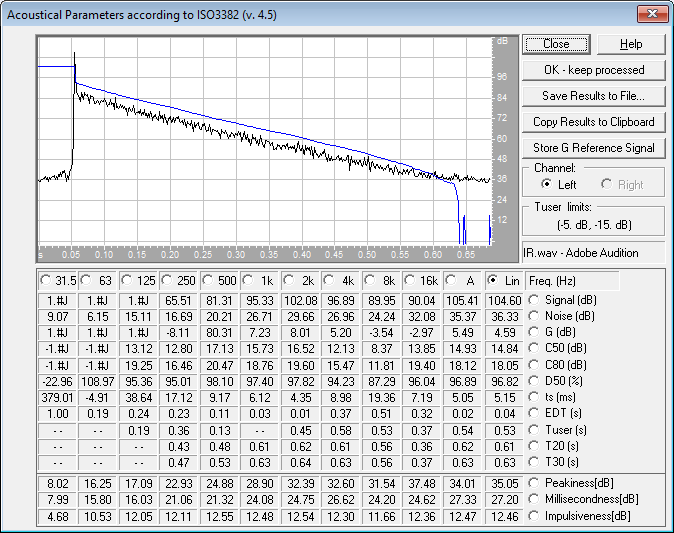
We can show the energetic impulse response at each frequency; we can also chart a specific acoustical parameter, for example reverberation time T20:
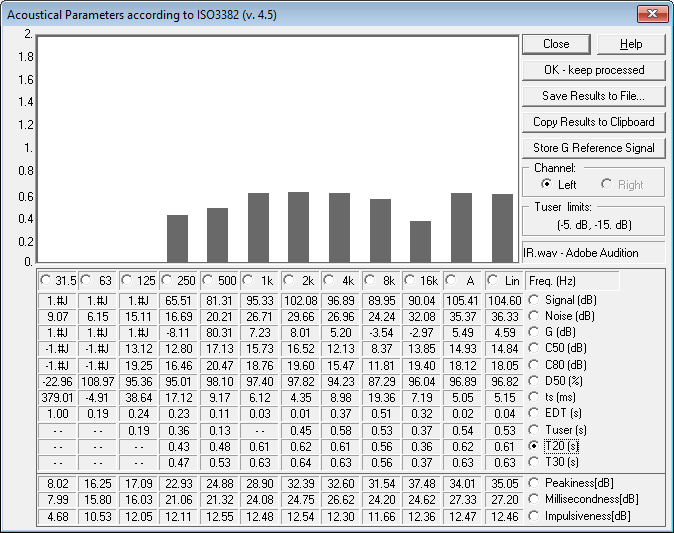
The computed acoustical parameters can obviously be copied to the clipboard, and pasted in Excel, or saved directly to a TXT file.
Now, if anyone has questions or needs clarification, please post your questions here below...
Edited by angelo.farina - 4/11/2019, 09:04


